Full Bloom - Part 2
27/05/2010
That's better BT is playing ball today, although I would say we are not at full speed - but hey ho anything is better then nothing!
It has taken me a while but we have added all the 25mm sheer ribbons to the website, remember the ones I used on these...

....you can find them all HERE. We have a few colours that we only have limited stock of, so we have put them in the Bargain Basket. At only 25p per mtr they are a TRUE bargain! Grab them while stocks last.
So here goes to our Part 2 of Ribbon Challenge # 15 - Full Blooms. We have stunning corkers for you, everyone has pulled out all the stops and come up with some really different goodies. All the ribbons used on these challenge goodies are from our Full Blooms range and can be found HERE.

Look at this wicked note book sent in by Leslie (woo hooo, I love notebooks!) Ribbon flower at the bottom and a ribbon keyring tag at the top - great fun.

This one is perfect for my bag, you just can not leave home without a notebook! I love the way Leslie has cut the motif from the ribbon to create the focal point on the front cover.

Ooooh this is very trendy, isn't it sweet. I am sure I know a little girl who would love to get her little mitts on this. I think you have a winner here Jan.

This card is BIG and bursting with colour, flowers, buttons and lace and a perfect colouring to the image. I wish I could colour like that Jan - I know, practice and practice.

What a beautiful corsage Jan, a safety pin sewn on the back, this will brighten any jacket adding style. I never thought of making one of those for the Flower Week - A Bloom A Day. Never mind there is always another time.

I was doing a bit of blog hopping the other night and I came across this delightful ribbon coloured box, "ooh I really like that, it looks like my ribbon, it IS my ribbon" - this was before I realised I was on Carol's blog. Silly me. All I can say is that it is soooo much better when you have this beauty in your hands, photo's do not do it justice. You do not want it back Carol - do you?

This large flower ribbon (you can find it HERE) is just perfect for cutting up! What a delightful colour combo Carol just perfect for little Tilda.

What a unique colour collection, it is stunning Carol. Never seen this little character before, is he new Carol?
I hope I have got your taste buds a popping and you are all rushing off to start designing with ribbon. There is more to come, I will share again tomorrow, I can not believe that it will be Friday again. We do still have 2 unclaimed prizes from last weeks Friday FREEBIE, so please get in touch with us craftyribbon@gmail.com otherwise we may have to give them away!!
See you tomorrow.

Full Bloom - Part 1
26/05/2010
It has been like having my birthday all over again today - I have been ripping open envelopes and boxes like a woman possessed!! We have some beauties for you over the next few days, this challenge certainly brought out the sunshine in you all!
We keep losing our broadband today, so this post is being written in batches, no problem to me. But Rachie and Bev and the order dept have been going crazy, the air is almost blue!! OH there is nothing BT can do to help, all their land lines are busy and they are suggesting we log onto their website - WE WOULD IF WE COULD!
Anyway here goes with the first picture, lets see how long it takes to load.

Oh what a princess, isn't she adorable. Natalie used the ribbon as a backing paper, yes the pink section with the white daisies is a ribbon. Very clever, we think it has worked well.

She looks just as pretty in yellow too Natalie. Same technique of using ribbon as paper.
Sorry I am having to give up on this post for today, the internet connection is so poor, it has taken me hours to load these two photos.
I will be back tomorrow - BT willing!!!
Fantastic Day
25/05/2010
I had a totally fantastic day, it was just wicked. I will tell you all about it after this....
Friday FREEBIE Winners. Sam helped me pick the winners this week from the top of his slide. I go away from the office for a day and a NEW toy arrives!!!

The lucky winners of the bags of spots are...
7. Sherry - "I only found your blog this week due to a fellow blogger (thanks Jan!) I love all your tutorials and have already added your button to my blog. Thanks for the opportunity of winning some of your delicious ribbons. I love your flowery flip flops - and happy birthday for Monday."
11. Noreen - "Wow, fab tutorial. Spots without being infectious, or itchy sounds fab. Have a great, summery weekend & a wonderful birthday!"
22. Ali - Oh dear, it's seem to be my lucky day -I have picked my own number!!!!! I will forget my number and keep on counting.
22. Jude - "i'm obsessed with these! how lush are they?! I neeeeeeeeeeeeeds them in my life..pretty please?"
31. Pam - "I can see spots before my eyes - ha ha. Would love to win these gorgeous ribbons."
Well done girls to claim your bag of spotty ribbons please leave a comment and send you address to craftyribbons@gmail.com. Everyone left such wonderful comments and thank you so much for my birthday wishes, I had a very special weekend and it was topped with a surprise day out. I had no idea that anything was planned, I just got told to be ready for 9am SHARP!
I tried every trick in the book to find out where we were going, asking leading questions, poking around for little hints, but Tony was giving nothing away. Bev told me I would need a pair of wellies and Rachie reckoned I was heading to the NEC - all I knew was that we had to drive for 3hours and 15mins.
My mind was racing I wanted to know - Tony kept on taking wrong turns and going all the way round roundabouts trying to stop my little grey cells working overtime. In the end it was obvious we were heading towards Cornwall.

We ended up here. Anyone recognise it?

After a walk round Padstow harbour, I was escorted to.... (I had an idea but should I spill the beans and spoil the surprise?)

...The Sea Food Restaurant - Rick Steins OH WOW!!!! We had a exquisite lunch. oh the fish, it was just amazing - a Birthday to remember. It was all down to this man.....

......My Tony - he will go mad when he reads this and sees the photo, but it was MY BIRTHDAY
Surprise!
24/05/2010
Just a very quick note, I am whisking Ali away for the day. She has no idea where I am taking her it is a total surprise. She will do the Friday FREEBIE draw tomorrow. Sorry for the delay.
Tony
Friday FREEBIE 21
21/05/2010
Wow it's Friday again, what a busy week we have had with all those blooms. We have no flowers or blooms for this weeks Friday FREEBIE, but a bag of spots - no they are not contagious!!
The spots are in.....

.....Bev's NEW Ribbon Bag. It's my birthday on Monday and I will be hummmcough4th, as a birthday special we are giving away 4 Bev's Bags for this weeks Friday FREEBIE prizes. So 4 prizes up for grabs, all you have to do for a chance to win, is leave a comment - simple.
Normal blurb - If your comment is being blocked by our spam filters please email the comment to us here craftyribbons@gmail.com and we will add it for you. Your email address will then be verified and you will be able to leave further comments without any hassle.
I have the last of our ribbon blooms from Flower Week - A Bloom A Day. I have been struggling to come up with a name for this flower. I saw it being demonstrated at Version Scrap in Paris a few weeks back, not understanding what they were saying I just had to watch and take it all in! They were making smaller versions for scrapbook pages, so would be suitable for cards, just use narrower ribbon.
I do take the strangest things out for a walk with me. Tony thought we went to the beach yesterday, for a stroll and take in the fresh salty air - narrrrrgh I wanted to take a photo!!!

As you guys know I am not a card maker, so I like to make different things, as Bev told me they are "Deffo different", she did add that they were wicked and fun - just perfect for the beach.
As I have no idea what the real name for this creation is I have decided to call it Mille Feuille Bloom - (thousand layer Bloom)
Mille Feuille Bloom

1. Gather the bits you will need - scissors, clothes pegs or bull dog clips and 23mm sheer ribbon in different colours, I used 3 cream, pink and purple. These ribbons are going onto the site later today.

2. Cut the ribbon into 17cm lengths you need 30 of these. Plus cut two extra pieces at about 30cm. All of these are for one shoe.

3. Layer the ribbons ontop of each other, mix the colours as you go. Hold in place with a peg.

4. Repeat on the other end - you should only have the two longer lengths of ribbons left.

5. Lay the stack of ribbon over the flip flop and tie in place with 1 of the longer lengths. Tie a second knot to secure.

6. Repeat step 5 with the last piece of ribbon , you want the knots to form a cross.

7. Pin back the two centre ties, so that you are left free to work on one of the ribbon stacks.

8. Pin the stack you are working on to the side of the flip flop, leaving the bottom two ribbons free.

9. With these two ribbons tie a knot, just a single knot but pull it quite tightly.

10. Continue to tie two ribbons at a time from the bottom until you only have 3 ribbons remaining from the first ribbon stack.

11. Swap to the second ribbon stack and repeat the process until you have only 3 ribbons left.

11. You should have 3 ribbons from each side that have not been knotted. Take the bottom ribbon from each side and knot together. Repeat with the other two pairs.

12. Gather all the ribbons up in one hand, you will notice that they are different lengths. While still holding them together, give them a hair cut! so they look all the same.

13. Finished Mille Feuiille Bloom.
What am I going to do with my self all next week, without any blooms to make - that's easy. The parcels have started to arrive for the Full Bloom Challenge so I will have lots to show you all.
Have a FANTASTIC weekend, the weather is meant to be wonderful (will see). The girls have invited me out to a birthday bash so can not wait.
Football Crazy
20/05/2010

Ribbon Rosettes, just perfect for joining in with the World Cup celebrations. We have even put together a special collection of World Cup Ribbons - Click HERE. Buy the WANT IT ALL Collection and you save a whopping £2.00 - go on go Football Crazy!
Ribbon Rosettes

1. Gather all the bits you need. Needle and thread, scissors, ruler and 10mm satin ribbon (you can find the red/white/blue ones HERE).
2. Cut 6 pieces of ribbon 15cm long. Fold each piece in half and press with thumb and finger to create a score line. You just need to know where the centre is.
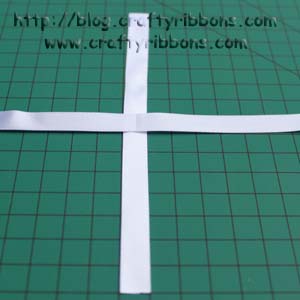
3. Lay two pieces onto a table, a marked cutting mat helps to keep your ribbons square.

4. Lay all 6 ribbon pieces out to create a circle, with the centre marks on top of each other.

5. Thread the needle (I am using red thread so you can see my stitching!), pierce the centre of the rosette with the needle.

6. Carefully pick up the rosette (apologies for the state of my thumb again, it is getting better), and push the needle through to the reverse. Make a few stitches, going all the way through to secure the ribbons together.

7. Fold one petal towards the centre, hold in place with your thumb, bring the needle through from the back and make a stitch. Push the needle back through to the reverse of the rosette.

8. Continue with step 7, stitching one petal to the centre at a time.

9. Keep going.

10. Fold over the last petal and sew in place.

11. Secure on the back with a few extra stitches.

Finished ribbon Rosette.

I sewed a football button into the centre of each rosette, well it was a World Cup themed card!
Just finishing off tomorrows bloom (Bev saw it this morning, she said it was "Deffo different!!!), then hoping to go for a stroll by the sea, I have been sat by the computer for far too long.
Double Ribbon Blooms
19/05/2010
Third day of our Flower Week - A Bloom A Day
We have a Double Ribbon Bloom all from one single piece of ribbon, magic.

I had a little helper with me while trying to take this photo. But he did carry the flower bag all the way to the park and back!

Sam is feeling much better and picking flowers was just what he needed to get some colour back in his cheeks.

Just checking to make sure they are all still in there!
Double Ribbon Blooms.

1. Gather at the bits you need around you. Scissors, needle and strong thread and ribbon. I used 40mm ribbon, grograins can be found here and I also used a selection of sheer ribbons from our Spring Time Collection which you can see here.

2. Cut the ribbon into a 22cm length, (if your ribbon is wired, remove the wire from one of the edges.) Fold the ribbon but not quite in half, the edge without the wire is the one to fold down. Thread the needle and put a knot in the bottom of the thread. Put the needle into the folded edge and sew along the fold. You can play around with the amount you fold down as this creates different sized double blooms.

3. Sew along the folded edge of the ribbon, make your stiches about 6-7mm in length and the same distance apart.

4. All sewn, you can now see the double bloom effect.

5. Remove the needle and gather the ribbon on the thread, pulling from both thread ends. Turn the flower over so you have the back facing you and tie a knot, so it is really tight, Tie another knot on top.

6. Depending on the type of ribbon you use, a thickish ribbon like grosgrain will leave a hole, while a sheer ribbon will gather up with no hole at all.

7. Use a scrap of ribbon and tie a knot in the centre.

8. Push the ribbon tails into the flower hole, use the tip of your scissors to help. You want the knot to sit on top of the flower hole. Secure the knot in place with a dab of glue or a few stitches.

Finished Double Ribbon Bloom.
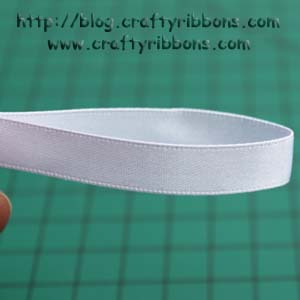
Have a play with different type of ribbons, this white bloom below was made using one of the NEW Ribbons from the Monochrome range yesterday (find it HERE).

This ribbon is half silver and half white, so is perfect for Double Ribbon Blooms!
Thank you for leaving wonderful comments, I still have a few more "Blooming" ribbon secrets to share with you.
Singed Flower
18/05/2010
We launched a NEW Range today, rather classy we think.
MONOCHROME

We added the NEW Ribbons to our existing Black & White range, so there are now loads and loads of black and white ribbons on our site, just waiting to be loved, stroked and played with.
Well, I had to have a play - with all those ribbons to choose from, who would be able to resist. So Friday night I took a roll of each ribbon home with me, I sat and stroked them all evening - just to get the feel! Then it hit me, an idea.....

...those glitter dots were just calling me. Look what beautiful flowers they make....

Singed Ribbon Flowers
If you want to know how to make them, then continue reading as here is the next tutorial in our Flower Week - A Bloom a Day.

1. Gather all the bits you need together - Scissors, needle and thread, candle and matches, a glass of water and sheer organza ribbon. Any organza ribbon works, I used a 70mm wired edge glitter dot (you can find it HERE) in black and white.

2. Cut a large circle(ish) shape from the ribbon. (If you are using the Glitter Dot Ribbon (HERE), then try to leave some plain sheer ribbon around the edge of the dots - I will explain why later on). Keep cutting smaller circle(ish) shapes from the ribbon.
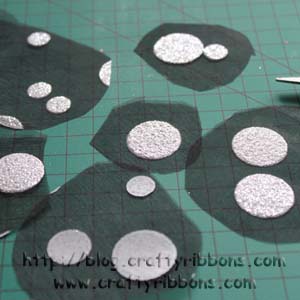
3. You want 4 to 6 different sized shapes, as you can see they do not need to be perfect circles.

4. Light your candle, (I really enjoyed this bit, I think I have a hint of a pyromania as well as ribbonholic in me!!) you can do this with a lighter but I found with the candle you have more control. Keep the glass of water close to hand, just in case you need to dunk the ribbon.
Pass the edge of the sheer organza ribbon close to the flame, you will see the edges of the ribbon start to singe. Keep moving the ribbon around so all the outer edges of the shape is singed. If using the glitter dot ribbon, you will find the dots produce a flame, but no problem either blow it out or dunk in the water.

5. You can see the difference between singed and not singed.

6. Continue singeing all the ribbon shapes.

7. Start with the largest shape and layer the other ribbon shapes ontop, finishing with the smallest.

8. Thread the needle and put a knot in the bottom of the thread. Gently pick up the flower and secure the centre with a stitch.

9. Secure at the back of the flower with a few extra stitches.

10. Finished Singed Ribbon Flower.

I could not waste those glitter dots, so I just put some double sided tape onto the back of the dots and cut them out - simple!

Here is a little pink flower I made from some 40mm ribbon (it's in our Bargain Basket and can be found HERE). Just 3 circles and a bead in the centre.
I am enjoying our Flower Week, hope you are too.
If you have a spare moment then have a look over at The Crafty Pad, they have a NEW competition starting today. You could win an exclusive collection of ribbons to match promarker pens.

Have a great evening and don't forget if you are trying these Singed Ribbon Flowers - be candle safe.
Spotty Dottie
18/05/2010
We all know that Bev is Dottie! There is nearly always a spot or polka dot ribbon in one of the Bev's Ribbon Bags - BUT this time.......
....she has gone Spotty Dottie!!!!!
ALL the ribbons in the NEW Bev's Ribbon Bag have spots or dots on them. 16mtrs of dots, all for the bargain price of £5.00 - that would make anyone go dottie!!!
Syd and Sam are still poorly, so Bev is at home looking after 2 sick babies. Poor Bev!! Get better soon Syd and Sam we need mummy back at work.
Shaggy Ribbon Flower
17/05/2010
Oh I have had a wonderful time playing with ribbons this weekend. I finally caught the cold/flu/virus/bug thing that everyone in the warehouse has had, so it was perfect just to sit back feeling sorry for myself and indulge in my pleasure of ribbon. More of that later, first we have the Friday FREEBIE winner. I managed to get an action shoot of the number being picked by Mollie.
The Friday FREEBIE winner is.....


....Number 9 Craftykitten
Craftykitten wrote - "Yummy, piles of pink prettiness to play with how cool would that be!! Good luck with your wall, lets hope you find loads of yumminess for more Friday Freebies!!
Hugs
Dawn x"
Congratulations Dawn, we hope you will be "Tickled Pink" with your prize, please do leave a comment and send us your address to craftyribbons@gmail.com. Thank you for all the other wonderful comments, Rachie and I did not make it all the way through the WALL! All you could hear were "Oooohs" and "Arrrrrhs" as we opened a new box. We will be back on WALL duty later in the week.
We all LOVE Ribbon (I don't think that is in question!) and I LOVE Flowers, so I have combined my two LOVES - Ribbon Flowers. Every day this week I am going to show you how to make a different ribbon flower, a bloom a day!
Shaggy Ribbon Flower

This Shaggy Ribbon Flower looks great and is really easy (I Promise) to make, this side view shows you how shaggy it is!

It is a while since my last tutorial, but here goes. (Apologies for the state of my thumb, I had an accident on Friday with one of the boxes from the WALL.)

1. Gather all your bits together. You will need a needle and strong thread, a small button (the spotty ones can be found HERE). The ribbon I used is a 22cm length of 40mm Grosgrain (HERE), but you can use any ribbon width, just change the length that you use.

2. My grosgrain ribbon had wired edges, so I just eased back the ribbon to find the end of the wire, then pulled it out. Repeat for the other side.

3. Thread the needle with strong sewing thread, you have to pull the thread really tight, so test the thread first to make sure it will not break, put a knot at the end of the thread. Fold the ribbon in half width-wise and sew along the top edge, do not make your stitches too small, about 8-9mm and the same distance from stitch to stitch.

4. Continue sewing along the length of the ribbon.

5. Once all sewn, it should look like this, remove the needle and open up the ribbon to remove the gathers.

6. Snip the ribbon about 1cm apart, do not go all the way to the sewn line. Continue snipping all the way along the length of ribbon.

7. Gather up the ribbon, pull it really tight and knot the thread to hold the gathers in place. Make a second knot to be safe.

8. Your ribbon may have already started to fray, if not rub it between your thumb and fingers. This will loosen the fibres where it has been snipped.

9. Sew the button to cover the hole in the centre of the flower.

Finished Shaggy Ribbon Flower.
I enjoyed making that, I now have a collection in different colours. You do not have to use grosgrain ribbon, have a play with other types. The more open weave the ribbon is the better "Shaggy" effect it will give.
Hope you will join me for tomorrows workshop, you will need a candle!

 my basket